Dried Apple Rings are a delicious and healthy snack that can be easily made at home. Unlike apple chips, these rings are soft, chewy, and retain the natural sweetness of the apples. Making your own dried apple rings allows you to control the ingredients and avoid added sugars and preservatives often found in store-bought versions. This simple recipe requires minimal tools and effort, making it a perfect option for anyone looking to enjoy a nutritious treat.
Benefits of Dried Apples

Nutrient Preservation
Dried apples retain most of their nutrients, including fiber, vitamins, and minerals. They are a good source of dietary fiber, which aids in digestion and helps maintain healthy blood sugar levels. The dehydration process concentrates the nutrients, making dried apples a dense source of vitamins such as Vitamin C and potassium.
Natural Sweetness
Homemade dried apple rings have no added sugars, relying solely on the natural sweetness of the apples. This makes them a healthier alternative to many commercial dried fruits, which often contain added sugars and preservatives.
Tips for Making Perfect Dried Apple Rings
Selecting Apples
Choose sweet apple varieties like Fuji or Honeycrisp for the best flavor. Avoid Red Delicious apples, as they tend to have a strange texture when dried. The natural sweetness of these varieties means you don’t need to add any extra sugar.
Preparation Techniques
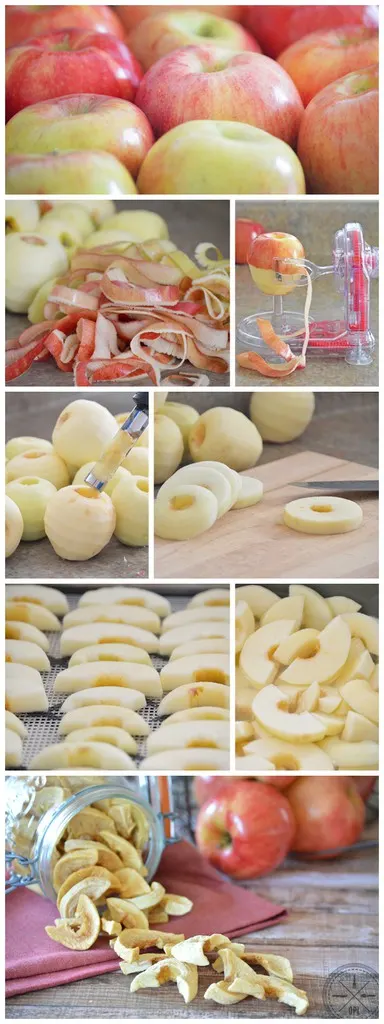
Peeling and coring the apples before slicing them into thick rings ensures a consistent texture and prevents the fruit from becoming too crispy. Using an apple peeler and corer can significantly speed up this process, making it more manageable, especially if you’re preparing a large batch.
Preventing Browning
Soak the apple slices in a mixture of cold water and lemon juice to prevent them from browning. This step not only maintains the aesthetic appeal of the apple rings but also adds a slight tangy flavor that complements the natural sweetness of the apples.
Dehydration Process
Temperature and Timing
Dehydrate the apple rings at 135°F until they are spongy and dry to the touch, but not crispy. This usually takes between 10-14 hours, depending on the thickness of the slices and the efficiency of your dehydrator. Check the apples after 10 hours to ensure they do not dry out too much.
Storage Tips
Once the apple rings are done, immediately place them in an airtight container to keep them from drying out further. This step helps them retain their chewy texture and enhances their flavor over the next few hours.
Conclusion
Dried Apple Rings are an easy-to-make, healthy snack that’s perfect for anyone looking to enjoy a natural, preservative-free treat. By following these simple steps, you can create delicious, chewy apple rings that are rich in nutrients and full of natural sweetness. Enjoy them as a standalone snack or use them in recipes like Apple Pie Bites for an extra touch of homemade goodness.

Dried Apple Rings
Apple rings can be pretty expensive to buy in the store, and they often have more ingredients in them than just apples. Take control of your food and make it yourself. Dehydrated apple rings are probably the easiest snack to make.
Ingredients
- Sweet Apples, Red Delicious has a strange texture when dried, they're not recommended
- 1-2 Lemons
Instructions
- Fill a large bowl about half-full with cold water and and lemon juice. I usually just eyeball it, about 1 lemon per 5-6 cups of water should be fine.
- Peel and core your apples. Slice them into very thick slices, about ½-inch. I like to cut my slices in half so they are half-moons, since I can fit more on a dehydrator tray.
- Place the apples slices in the lemon water as you go to keep them from browning.
- When all the apples are sliced, remove them from the water and place them evenly on the dehydrator trays, close but not touching.
- Dehydrate at 135°F until they are spongy and dry to the touch, but not crispy. This usually takes between 10-14 hours, depending on how accurately you slice the apples and the type of dehydrator you have. Keep an eye on them after the 10-hour mark to make sure they don't dry out too much.
- Once they are done, immediately place them in an airtight container or bag to keep them from drying out. This step is important, it will soften them up a bit more over the next few hours.
Nutrition Information
Serving Size 1 gAmount Per Serving Unsaturated Fat 0g

Liz
Sunday 23rd of October 2022
Not that these will left long enough in our household, but just in case, how long would these last for? Not sure if I've missed it.
Kendra Benson
Monday 24th of October 2022
They don't last too long in our house either :) If they are stored in an airtight container, they should be good for up to 6 months, ideally.
Louise
Thursday 13th of October 2022
Since my apples are organic, I'd like to leave the peal on. Is that a problem? Thank you.
Rob Benson
Friday 14th of October 2022
Not at all! :)
CK
Saturday 7th of November 2020
Hi! Do you dry off the apples in the water before drying? Thank you :)
Kendra Benson
Tuesday 10th of November 2020
We don't dry them off, just move them straight from the water to the dehydrator.
Sally Thomas
Tuesday 11th of September 2018
I no longer have access to my old apple orchard,and I purchased "chewy" dried apple rings on the internet for doggy treats. I recently purchased a 5 lb bag but my last dog had to be put down a week ago and I am stuck with this bag of apple rings. Can you give me any hints for recipes using this type of dried apple rings? They are "pure", no preservatives or anything, so I they would be perfect for human consumption. I do enjoy chewing on them, but I could never eat all of these before they spoiled. Can they be used for pies/tarts etc? Thanks for a reply.
Kendra Benson
Tuesday 11th of September 2018
I usually use them to make my Apple Pie Bites (https://www.ourpaleolife.com/apple-pie-bites/).
Stephanie
Wednesday 12th of March 2014
Can I make these in the oven somehow? I don't have a dehydrator but these look amazing.
Kendra
Wednesday 12th of March 2014
Ovens don't usually get to a low enough temp. You could try turning it to the lowest settings (which is usually 170F or 200F) and leaving the oven door cracked. I'm not sure how long it would take, and I'm not sure I'd want to leave my oven on that long. Definitely wouldn't be a summer recipe if you choose to go that route, way too hot in the house!